• Entertainment
  • Musicians
  • Recreation
  • Guitars
  • Playing Styles

Guitar Licks

Guitars, tips and great music discussions

  • Home
  • Blog
  • Archives
  • Links
  • About
  • Guest Blogger
  • Contact


You are here: Home / Archives for Guitar Maintenance

Tremolo Bars

August 2, 2007 by Chris

Has anyone ever wondered what the tremolo setup in their guitars look like, but was too afraid to take it apart. I’ve never had a guitar with a tremolo bar but my buddy did and one day he decided to show me.

My buddy in Brantford was a collector of guitars. He was rather talented, but was more into collecting them, then playing them. Nice hobby if you can afford it. I was very fortunate one evening to see a “59 Fender Strat” that he had picked up for his collection.

One night I was invited to bring my HiWatt and Gibson RD to his house with a couple of buddies to jam. I had come in, set up my amp and he gave me a beer. The boys always looked forward to jammin’ with me because I was one of the few guitar players who liked to challenge myself with different playing techniques. Most of the time they just watched and asked questions. That always drives me crazy! Then my buddy went over and brought out a guitar case and placed it in front of me.

When he opened the case, I felt my body shaking inside. It felt like someone had just opened up the “Ark of the Covenant” and was looking at the “10 Commandments” written by God and given to Moses on the mountain, inside!

I had never seen this legendary 59 Strat let alone had the ability to play it.

I just looked at it for a while and then he said “why don’t you plug it in?” I then picked it up and studied it intensely. After 10 minutes of viewing every angle and part of this mythical beast, I plugged it in and played for around 2 hours straight.

After I stopped playing I asked him “What does the Whammy (Tremolo) Bar system look like?”. He drew a quick picture on a pack of smokes and then asked me if I wanted to see this one’s? The guy who he had bought it from then took it from me and started to take off the back to expose the inner workings of it. It looked something like this:

fender-trem-as.jpg

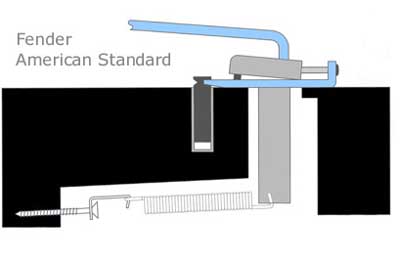
Now to give you a better understanding how it works, I have a video for you.

So if you have one of these on your axe, you now have a better idea of how it works and how to roughly adjust it. I strongly recommend that you take the back cover off it and just take a look around just for an educational experience.

Remember by taking the cover off the back of your guitar to take a look, you won’t blow it up! This will make you more aware of your overall guitar and make you feel more comfortable with it. Knowledge is power and besides, it makes you look like you know what your talking about.

Take pictures and save them. Later on this may become a life saver if you do start adjusting it. This will allow you to see what it looked like before you started. Actually, take pictures of every stage of it. There is nothing worse then having a couple of screws left over when you think your done! It happens to the best of us!

Keep on Jammin’


Filed Under: Electronics, Guitar Equipment, Guitar Maintenance, Guitars, My experiences, Technology, Video Tagged With: 59 Fender Strat, adjust, amp, Brantford, diagram, fender, fender whammy bars, guitar, Guitar Maintenance, guitar player, guitar whammy bars, guitars, Hiwatt, how to, maintenance, picture, play, playing, tremolo, tremolo bars, tremolo setup, Video, whammy, Whammy bars

I’m not violent but shouldn’t someone get these idiots

April 9, 2007 by Chris

I am forever asking certain guitar players “why don’t you wind up the excess string on the end of your guitar head? Someone is going to lose an eye!” This style of finishing is like a cowboy lasso. I always ask them if they have ever had the end of their string go into their finger or hand when restringing? Can you imagine what would happen if that nice little lasso thing ever untangled and hit someones eye? Well if that ever happened, you better get a lawyer, and fast!

When I was in high school, I had the honour of being in a band with the best theoretical guitar player/teacher I have ever known. These accomplished musicians, like most I played with in my early years, were much, much older then I was. We were in this band that played Beatles tunes and the like, only to make money and not a career of it. I was the only student that Chris P ever played in a band with to my knowledge. I recall with crystal clarity the day I learned this lesson about the excess string thing.

The bass player in the band was the best in our area. He was a big body builder as well. He was more like a fridge with legs, in all honestly. I was one of those idiots in my early years, who thought it was cool to have my strings tied up at the end of the guitar that looked like a lasso looking thing. The first practice we had, he stood up beside me and looked me in the eye, having to bend down really low to do so and said “I had a string like that almost pick my eye out by a guitar player once”. After having let the water that poured down my leg dry, I ran to find some pliers to cut off the excess. He was really a nice guy but …

Unless your perfect, and we all know someone like this, getting the end of a string in the finger is such a painful experience. I have had this experience a couple of times and believe me, you will pay much more attention when you restring your guitar in the future, if this ever happens to you. I actually nicked or pierced my finger while cleaning the head of my guitar once as well. There you go kids, cleaning is bad for your health, you heard it here first!

Always practice safe guitar maintenance.

Keep on Jammin’

Filed Under: Guitar Equipment, Guitar Maintenance Tagged With: guitar, Guitar Maintenance, guitar player, Guitar safety, Guitar upkeep, learn, musician, pain, restring your guitar, strings

How to restring your guitar

April 6, 2007 by Chris

NOTE: This is for beginners -as in people wanting to learn more about restringing techniques.

You know, this is my favorite but most dangerous part of guitar maintenance that I or you will ever do. Watch you fingers when working with the strings at the head of the the guitar. Look at some previous posts for medical advise.

(1) Take the strings out of the package. You either have strings that are colour coated, with a chart on the box or you can figure them out by looking closely at them. The thickest string is at the top and the thinest at the bottom.

(2) Put the string through the tail piece (on the body of the guitar).

(3) Place the body of the guitar on a table, with blanket on it so you don’t scratch the bottom of guitar. It also helps you move the guitar fast and smoothly when working. Make sure that you can have access to a chair so you can work at a good eye level to watch closely at what your doing.

Part (4) is background info that you need to understand before proceeding to part (5) & (6)

(4) Follow these visual steps. The last picture shows a little gap from where the bottom of the string is to the remaining part of the shaft of the tuning peg. I leave enough string or slack allows me to keep turning the tuning knob until the bottom of the string completely fills that space. I do not like to see any part of that shaft exposed. The more string that is attached means, a tighter wind and less room for the string to stretch. A change in the tension of the string = a change in tuning.

NOTE: This is the tricky part that you will have to determine by yourself because every guitar dimensions are different. After doing a couple of strings, you will get the hang of it. IF YOU DO THIS WRONG, YOUR GUITAR WILL NOT BLOW UP, ok? Just relax. Do not attempt while intoxicated.

(5) Move the guitar on the table so you can sit in a position that will allow you have the guitar head over and away from the table to let you start winding the strings.

(6) At this point we actually can start the winding process. Now with your right hand, grab the string that your working on by having fingers (index to pinkie), pulling up on the string while using your thumb pushing down on the string.

NOTE: Have your thumb push the string down on the fret board, right near the nut, where the string is suppose to be on the neck of the guitar. This will provide a small amount of the tension you will need to start winding the tuning peg.

(7) SLOWLY turn the tuning peg in the direction that you want. For guitars with 3 strings on each side of the head of the guitar, turn the head counter clock wise; for all others go clock wise. Pay close attention to the string that it follows going down the tuning head that will cover the gap that I talked about in part (4). The more you reach the bottom of this tuning peg, let the tension that you thumb is exerting on the string off little by little until you have covered that area of the shaft of the tuning peg.

(8) Place any finger you want to use (I use my index) directly on the nut (the white piece between the top of the neck and head of the guitar) of the guitar that corresponds to which string you are replacing. I want you to put pressure on that direct spot that holds your new string in place. This will stop the string from moving anywhere while you are doing the next part.

(9) With your right hand, grab the string that you are working on and pull the string in a upward and downward direction. Remember to keep your finger down tightly on the nut. What this is doing is, by pulling upwards and downwards on the strings, it tightens or pulls the strings coils on the tuning head closer thus making them less likely to move or slip.

Note: A change in tension = a change in the note or key of the string. When they slip or loosen up, the guitar string goes out of tune. The exact tension of the strings determines how they vibrate. The vibration is the note you want. Think about how a sign wave works, if your not sure or want to know more look up the details. Remember, knowledge is power.

Keep on Jammin’

Filed Under: Guitar Equipment, Guitar Maintenance Tagged With: acoustic guitar, electric guitar, guitar, Guitar Maintenance, how to, How to re string your guitar, restringing your guitar, string tension, tightening strings, vibration

Breaking in new guitar strings

April 3, 2007 by Chris

After putting new strings on your guitar, do you ever notice that they go out of tune easily for a while after? You’d think that after all of your careful preparation and time that you put into it, that you shouldn’t have to worry about tuning it for a long time to come? WRONG! You have to break them in.

What I do religiously after putting strings on is this.

(1) Put the guitar on your lap.

(2) Place any finger you want to use on your left hand, (I use my index) directly on the nut (the white piece between the top of the neck and head of the guitar) of the guitar that corresponds to which string you are replacing. I want you to put pressure on that direct spot. This will stop the string from moving anywhere while you are doing the next part.

(3) With your right hand, grab the string that you are working on and pull the string up and down. Remember to keep your finger down tightly on the nut. What this is doing is, by pulling upwards and downwards on the strings, it tightens or pulls the strings on the tuning head closer together thus making them less likely to move or slip in the future.

Note: When strings slip or loosen up the guitar goes out of tune. The exact tension of the strings determines how they vibrate and at what frequency. The vibration is the note you want. Think about how a sign way works, if your not sure or want to know more look up more details.

This is important when re-stringing while playing live because without doing this before you start playing again, the string will become more and more out of tune every time you hit or bend the string, thus making you sound like a fool. You don’t want that do you?

Keep on Jammin’

Filed Under: Guitar Equipment, Guitar Maintenance Tagged With: break in guitar string, Guitar Maintenance, guitar tuning, How to keep your guitar strings in tune, tighten guitar string, vibration

Humidity issues

January 14, 2007 by Chris

This is the most important part of guitar maintenance that you always forget. I know that this is a problem that I have from time to time.

I just can’t resist the look of my Larrivee in the morning when I wake up and walk on down the stairs! When the sun bounces off it’s beautiful finish and refracts the light into our living room. We do use a cold mist humidifier and have the furnace humidifier around 35%. I also use a “Damp it, Super” with my guitars as well.

The Humidity Levels on acoustic guitars should monitored more closely now that you are aware of it, there are NO EXCUSES! I wish that I payed attention to this when I first got my Sitar. Now, the damage to this fragile instrument is irreversible. Don’t let this happen to you!

Filed Under: Guitar Maintenance Tagged With: fixing guitar intonation, guitar action, guitar bridge, guitar damp it super, Guitar Maintenance, guitar sound board, warping guitar body

Connect with Us

  • RSS

Suggested Sites


Eavestrough Cleaning Toronto

Categories

Recent Posts

  • 5 Amazing Alternative Rock Albums Of The 90s
  • Want To Learn To Be A Musician?
  • How Can Ambitious Musicians Find Great Advice From Professionals?
  • Which Musical Instruments Are Hardest To Learn?
  • Things To Know When Beginning A Career In Music
  • Suicidal Tendencies Still Rocking After All These Years
  • Learning Guitar Basics Online

Recent Comments

  • Judy Green on The Old Gasworks was a Toronto institution for music lovers and bands
  • Frank Bolduc on The Old Gasworks was a Toronto institution for music lovers and bands
  • Tom Farr on 5 Amazing Alternative Rock Albums Of The 90s
  • DW on 5 Amazing Alternative Rock Albums Of The 90s
  • Nick Othen on 5 Famous People And Their Guitars

Subscribe

Never miss a post
FREE - Subscribe NOW!
Read our posts in your favorite RSS reader.
rss feed

OR

Subscribe to Guitar Licks by FREE Email Newsletter


Follow us on TWITTER!

Alltop, confirmation that I kick ass
Alltop Guitar news

Shopping

Gifts, Gadgets,
Books and More!

Site Ratings

Visitors


Meta

  • Log in
  • Entries feed
  • Comments feed
  • WordPress.org

Archives

Search

Pages

  • About
  • Archives
  • Become a Guest Blogger for Guest Licks
  • Blog
  • Canadian Bloggers
  • Contact
  • Disclosure
  • Do Follow Bloggers
  • Links
  • Privacy Policy
  • Toronto Bloggers

Blogroll

  • Guitar Boomer
  • Guitar-Werks
  • Eavestrough Cleaning Toronto

My Store

  • My Store

Other Sites

  • Breath of Life Photography
  • Shopping Maniac
  • Tricia's Musings
  • Get WebStyle
  • Tricia's Chinese Water dragon, reptile and amphibian care

Tags

Acoustic amp band bands Brantford Bruce Cockburn Canada Canadian concert Entertainment fender funny General guitar Guitar Equipment guitarist guitar player guitars Home house Humor humour instrument jammin jazz John Mayer keyboard Live Music musician Musicians play playing Progressive Rock Pylis rock RUSH Songs to play sound strings Technology Toronto tour Video YES

Copyright © 2026 · News Pro Theme on Genesis Framework · WordPress · Log in